
There’s no denying that WordPress is a great content management system (CMS): the fact that nearly 40% of websites on the internet are built on WordPress is a testament to this fact (Techjury). It’s beginner-friendly enough that creating a WordPress website is manageable by just about anyone and flexible enough for the most experienced developers to turn their vision into reality.
No matter how simple or complex the projects you’re creating are, they all start with the WordPress settings panel. These WordPress configurations control many important aspects of how your client websites work, so understanding exactly how each setting impacts the site can help make your next installation a breeze. Read on to learn about six important default WordPress settings, including what they control and what your default choices should be when managing multiple client websites.
Rebrand and resell an easy-to-use WordPress hosting solution
Managing multiple sites with default WordPress settings
As user-friendly as WordPress is, managing WordPress multiple domains requires a solid understanding of how different default settings work so that you can ensure all the sites you’re responsible for work without a hitch.
Digital agencies offering web design services can benefit from having a default WordPress configuration that can be applied to every project in some important ways:
- It makes setup faster. No matter who is working on a website—whether it’s a new staff member or a white-label service provider working under your agency’s name—users can quickly and correctly set up new projects from the start. Just make sure you have internal guidelines for default WordPress settings to use.
- It’s easier to instruct clients on how to make small updates themselves. Getting familiar with WordPress settings and configuration enables agencies to create guideline documents for clients to refer to if they encounter issues or want to be able to make small changes themselves.
- It can impact SEO performance. Many important default WordPress settings impact SEO, so knowing how to adjust these to maximize discoverability can help clients get the most out of their new websites by growing their traffic. This is especially critical for digital agencies that also offer SEO services.
Website Pro for WordPress websites
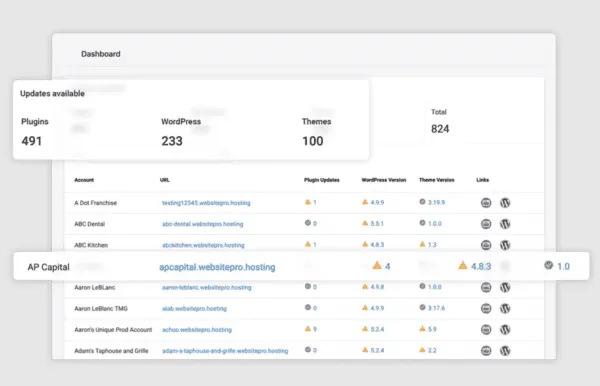
Managing multiple WordPress domains can be time-consuming if doing so directly through WordPress. That’s because it requires logging in and out of each account to make updates and spot errors and issues. A good way to overcome this—and dramatically reduce time spent managing multiple sites—is with a website builder and WordPress management solution like Website Pro.
Creating a WordPress website is easy thanks to the drag-and-drop page builder and hosting by Google. Website Pro can then be used to see all of your WordPress websites from a single admin dashboard, so you can spot those that need updates at a glance and prioritize your site management work accordingly.
If you do need to open up the WordPress dashboard for a URL, just click their link, and the Website Pro dashboard for that website will open: no need to log in and out. You’ll see analytics like Google Search Console insights and other granular information, and you can easily head back to your admin dashboard when you’re done.
Website Pro can also be white-labeled as a reseller website solution, so if clients want to build their sites in-house, they can do so with this powerful SaaS reseller solution.
6 Important default WordPress settings
Let’s take a closer look at how six important settings, all of which users can easily access and configure from the WordPress dashboard, can positively impact any WordPress website.
1. User settings
WordPress’s user settings define the role that different users have, providing control over access levels and permissions on the website.
To access user settings, log in to your WordPress admin dashboard. Then, navigate to “Users” in the left-hand menu. From here, you can view a list of all users, add new users, or edit existing user profiles.
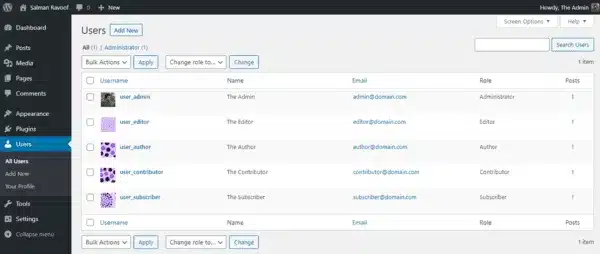
WordPress offers several predefined user roles, each with its own set of permissions:
- Administrator: Has full access to all website features, settings, and content management. Administrators can manage other users, themes, and plugins. This includes the ability to add, edit, or remove users.
- Editor: Can create, edit, publish, and delete any posts or pages, including those created by other users. Editors can also moderate comments and manage categories, tags, and links.
- Author: Can create, edit, publish, and delete their own posts. Authors cannot edit other users’ posts or manage website settings.
- Contributor: Can create and edit their own posts but can’t publish them. Contributors need approval from an Editor or Administrator to publish their content.
- Subscriber: Has limited access, usually only able to manage their profile and leave comments on posts if enabled.
When you add or edit a user, you can configure various profile settings such as username, email, first name, last name, website, and biographical information. You can also assign a specific user role to control the level of access they have to the website.WordPress also allows you to create custom user roles with specific permissions using plugins like “User Role Editor” or “Members.” This can be helpful if you or your clients need more granular control over user access levels and capabilities.
2. Permalink settings
Permalink WordPress configurations allow you to configure the structure of a website’s URLs. These impact website navigation and user experience, and are an important component of technical SEO. URLs are automatically created for individual posts, pages, and any other content on your client’s website.To access permalink settings, head to “Settings” in the left-hand menu and click on “Permalinks”.
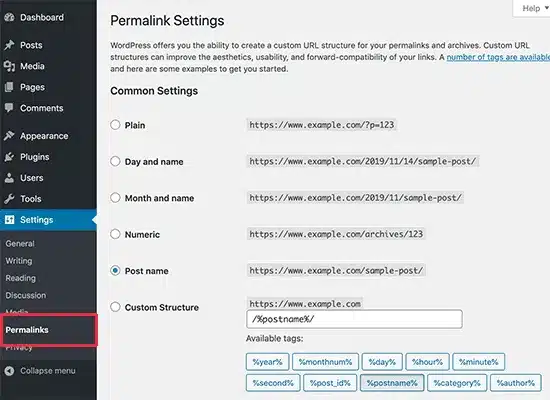
This will open up the option to choose from several predefined permalink structures, plus a custom structure option:
- Plain: The default setting, which uses the post ID. This is a long string of numbers and is not recommended. Not only does it look messy, but since it isn’t descriptive, it’s not helpful from an SEO perspective either.
- Day and name: Includes the year, month, and day of the post, followed by the post title.
- Month and name: Includes the year and month of the post, followed by the post title.
- Numeric: Uses the post ID within an “archives” directory. Again, this isn’t a great choice for UX or SEO.
- Post name: Uses the post title as the URL. For most client websites, this will be the optimal choice. It’s easy to understand both by human users and algorithm bots.
- Custom structure: Allows you to create your own permalink structure using available tags.
This setting is quick and simple to change, and can have a big payoff in terms of improving the user experience of website visitors and helping webpages appear at the top of their relevant SERPs.
Clear and descriptive permalinks—like the “Post name” option—make it easier for users to understand the content of a page before clicking on a link. And since search engines consider URLs as a ranking factor, descriptive and keyword-rich permalinks can help improve a site’s visibility in search engine results.
3. Media settings
Media WordPress configurations control the default behavior and dimensions for images uploaded to a site. Since 39% of users stop engaging with content if images won’t load, it’s important to get these right (Vendasta).
Users can access media settings from the left-hand “Settings” menu, just above “Permalinks”.
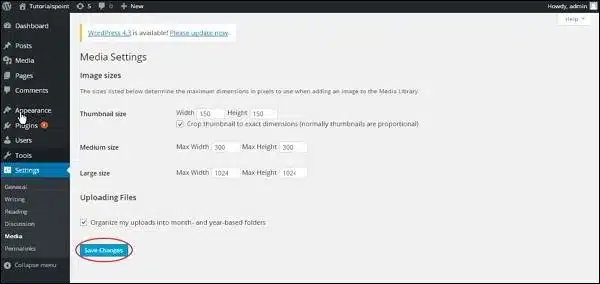
Here, you choose the default dimensions for three image sizes appearing on the website: WordPress thumbnail size, medium images, and large images. Whenever an image is uploaded to WordPress, an automatically resized version will be created based on the settings established here. It’s worth noting that WordPress will maintain the aspect ratio of an image when resizing it, so you don’t have to worry about images becoming distorted based on the maximum width and height defined in Media settings.
So, why do these default settings deserve your attention? Properly sized images can reduce file sizes and improve page load speed, contributing to better UX. Page load speeds are key ranking factor for Google, so web designers need to be mindful of how large images can drag downloading times.
Media settings are also important from the point of view of mobile responsiveness. Images should be large enough to look attractive on large screens with high resolutions, without sacrificing loading times.
4. Reading settings
Found in the left-hand “Settings” menu, Reading settings control how a website’s content is displayed on the homepage and in the blog or news feed. Depending on the design of your client websites, the homepage may not display blog posts. However, since most websites have some kind of blog, they’ll at least have a page where all blog posts can be seen.
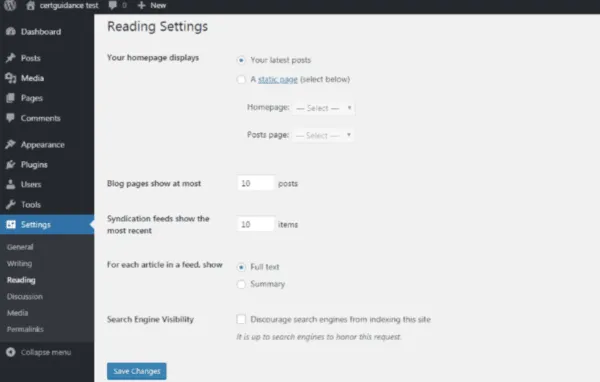
The settings to pay attention to on this page are:
- Front page displays: Choose from two options for how content is displayed on the home page:
- Your latest posts: Usually the best choice
- A static page: Suitable if the client wants to highlight past well-performing posts on the homepage.
- For each post in a feed, choose whether full text or just a summary of each new post appears in your RSS feed. Summaries can encourage users to click through, driving more traffic.
- Search engine visibility: Leave this option unchecked for live websites, otherwise WordPress will add a “noindex” tag to them making them undiscoverable in search.
5. Discussion settings
These settings control how comments and interactions are managed on the website, and are located in the left-hand “Settings” menu.

The purpose of discussion settings is to enable businesses to control their comment sections and avoid disrespectful or spammy content from being posted, which can have a detrimental effect on UX.
Settings to pay attention to on this panel are:
- Default article settings: The first two checked boxes refer to notifications that result from WordPress blogs interacting with each other, and will only be relevant for some clients. The third checked box is important: it determines whether people are allowed to leave comments on blog posts. Some businesses, like many ecommerce businesses, have comments disabled.
- Comment moderation: These determine the number of links allowed in a comment, and allow users to create a list of moderation keywords that trigger manual approval before they appear on the site. The default settings are usually sufficient, but depending on your client’s industry, they may want to add additional moderation keywords.
- Comment blacklist: List words, phrases, or IP addresses that automatically mark a new comment as spam.
- Avatars: Choose if the site will display default avatars or custom avatars for users who leave comments.
For websites that enable user discussions, these settings help create a positive environment for user interactions.
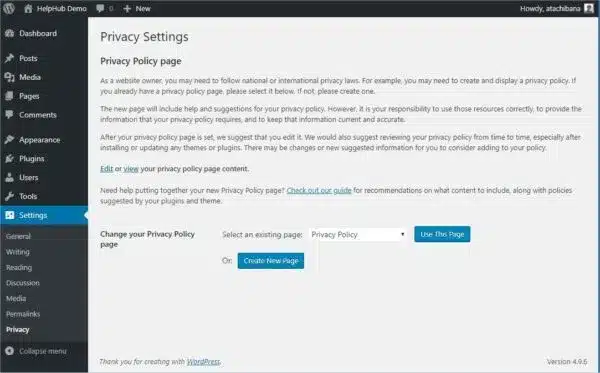
6. Privacy settings
Privacy policies are legally mandated in most jurisdictions, so it’s important to add them to all client projects. The privacy settings screen, found under the left-hand “Settings” menu, enables you to assign an existing page as the Privacy Policy page or to create one.
Discuss with your clients whether they already have a privacy policy created. If not, WordPress will generate a template that can be completed to reflect the practices of the business.
Bonus: Templated contact forms
Some settings, like WordPress SMTP settings and contact form settings, can’t be created directly in WordPress. However, there are plugins and website builders—like Website Pro—that can get the job done. Having templated contact forms to easily create for client websites makes it easy for their audience to get in touch with them.
Some best practices for templated contact forms include:
- Keep it simple. Complex forms tend to be difficult to use on mobile screens, so simple forms are a better choice when it comes to mobile responsiveness.
- Use placeholder text. This helps users quickly understand what kind of data they should include in the field.
- Use a powerful call to action. Instead of just having a “submit” button, use a more engaging CTA that reflects your client’s brand.
WordPress Settings FAQs
1. What default WordPress settings matter most when managing multiple sites?
The most important settings are user roles, permalinks, media sizes, reading preferences, discussion moderation, and privacy configuration. These shape access control, SEO structure, performance, and content display for every site you manage.
2. How do user roles help manage multiple WordPress websites efficiently?
User roles define permissions, preventing unauthorized changes and reducing errors. When managing many sites, using consistent roles helps streamline workflows and keeps client environments secure.
3. Which permalink structure is best for SEO across multiple WordPress sites?
The “Post name” structure is the strongest option. It creates clean, keyword-friendly URLs that Google understands, improving crawlability and supporting stronger SEO performance across all installs.
4. Why should agencies adjust media settings on every WordPress install?
Default media sizes affect load speed, which heavily impacts rankings and bounce rates. Setting proper thumbnail, medium, and large dimensions ensures faster pages and better user experience.
5. How do reading settings influence SEO and user experience?
Reading settings determine how homepages and blog feeds present content. Selecting summaries instead of full posts improves scanning, boosts click-through, and helps search engines understand site hierarchy.
6. Why are discussion settings important for multi-site WordPress management?
Standardizing discussion settings reduces spam, filters harmful content, protects brand reputation, and minimizes cleanup time—crucial when you oversee many client sites.
7. What should agencies know about WordPress privacy settings?
Every site needs a compliant privacy policy. WordPress’s built-in privacy assignment helps agencies quickly standardize legal pages while staying aligned with regional requirements.
8. How does Website Pro simplify managing multiple WordPress sites?
Website Pro gives you a single dashboard to update plugins, themes, and WordPress versions with one click. It eliminates repetitive logins and speeds up multi-site maintenance.
9. Can default WordPress settings improve SEO performance across multiple sites?
Yes. Correct permalinks, optimized media, clean reading settings, and proper indexing all signal relevance and structure to search engines, strengthening SEO across your entire portfolio.
10. What additional tools help agencies managing WordPress at scale?
SMTP setup, standardized form templates, caching, security plugins, and Google Cloud hosting (via Website Pro) all boost reliability, performance, and automation for multi-site workflows.
