
Before launching websites you’re creating and reselling for clients, it’s essential for you to run multiple tests to ensure new features (and new websites) runs smoothly. Cloning and staging your client’s websites allow you to create exact copies for testing any new changes and updates, helping you ensure peace of mind without any live bugs or errors.
In this article, you’ll learn more about tips and best practices for how to clone a website for staging, and how Website Pro makes this process easy for guaranteed website testing and launching success.
Leverage a suite of web hosting tools to do the heavy lifting for you
When and why would you need to clone a website?
Cloning a website is just as it sounds: taking everything from one site and creating an exact duplicate. More often, cloning a website allows you to create an exact copy of your existing website and allows developers to use it as a staging environment for testing any new changes before it goes live to users.
Testing website changes on the cloned website also mitigates any chances of errors being pushed to the end user, allowing web developers to make updates and experiment with new features without the risk of breaking the live site. Below are just some of the additional use cases you should consider for cloning your client’s website for staging purposes.
To back up a website
In the event that unexpected issues with your client’s website occur, such as crashes, data loss, or cyberattacks, having a backup copy of it ensures you’ll always have another version of the site to restore it to. Since a clone is an exact copy of your website’s code, you can also use it to build another website from scratch or launch a new version of the original one.
To test compatibility
It’s a great practice to make any changes and updates on a staging site first before pushing it live, such as a brand-new theme or WordPress plug-in. This ensures any new feature or updated functionalities meshes well with the current website’s infrastructure, and performs optimally with no compatibility issues.
Using a staging environment also lets you experiment with different layouts and configurations to see whether users and stakeholders respond to the new look well.
Moving to a new server
If you’re considering a new web hosting provider because your client’s websites need better performance and security to meet their user’s demands, this is where a cloned version of their site comes in handy. This allows you to test the site and determine whether it’ll perform the same, or better, on the new hosting solutions without it affecting the existing website or server.
When you do decide to migrate your websites over from AWS to Google Cloud, you can easily push it live through the cloned site. This’ll make your client’s website accessible to users throughout the entire migration process without any interruptions.
Making significant changes to your website
To provide a positive user experience online, you’ll want to make sure your client’s website keep up with the latest web features and functionalities applicable to their business. Should you be tasked with a major website overhaul project that includes complete redesigns, adding new features or changing the layout, it should always be done through a staging environment to ensure all the changes work—and work together properly.
Why you need to clone a website to create a staging environment
Ensuring the security and functionality of your client’s website is paramount to the success of your website management service offerings, specifically for:
- Testing: Since the staging site for WordPress is a copy of your client’s website, it allows you to test website changes and updates before pushing them live to the public. It’s also a great way of identifying and managing any errors, bugs, or issues before they get worse.
- Flexibility: If you’re looking to test and experiment new features on a client website, using a staging environment mitigates any risk of any negative effects on other components of the live website.
- Collaboration: Not only does a staging environment help you and your web design team collaborate with each other to build the website, but it also helps you provide your client with a mock design that they can provide notes feedback on.
- Security: In some instances, introducing new plug-ins, code, or extensions to a website can pose additional security breaches or risks if they don’t work properly with the site. Using a staging environment in this case gives you the opportunity to test and confirm whether these breaches could happen on the live website.
- Efficiency: Changes and updates made to a staging site can be tested more quickly and efficiently, as it would take less time and resources to fix and restore the staging version of a site.
Best practices for how to clone a website for staging
When you’re reselling white-label websites to your clients, it’s important to ensure the live version of their site gets pushed through with zero hiccups in the process. Here are a few best practices you should follow when you clone your client’s website for staging purposes.
Choose the right cloning method
When cloning a website for staging, choosing the correct method is essential to ensure easy and reliable migration. A staging plugin, such as WP Staging or Duplicator, is one of the most popular methods. This allows you to create an exact replica of your website quickly and easily on a separate URL. You can then test edits or updates before pushing them live.
However, you can easily clone a website using the staging tool on Website Pro (which we’ll get to down below). Whichever method you pick, follow best practices like taking regular backups of your site and testing changes carefully before pushing them live.
Update your WordPress plugins
Outdated versions of plug-ins can sometimes contain vulnerabilities that can pose as a security risk to your client’s website and its users. Additionally, you may have encounter problems that can’t be solved for older versions of your plug-ins, because Support may be reduced for it.
Not only does updating your plug-ins give your client’s website new features, software updates for plug-ins often contain bug fixes and performance improvements that guarantee compatibility with whichever version of WordPress it uses.
Remove unused themes and plugins
On that same note, unused themes or templates, as well as plugins can significantly slow down the performance of a website, which is why it’s important to remove any that you’re not currently using. Unused themes should be deleted from the server, while active plugins should be deactivated and then removed.
It’s also important to keep track of which plugins are currently being used on the original site to avoid issues when updating or cloning for staging purposes. Additionally, it’s a good idea to identify and delete any outdated or incompatible software that may be causing issues as well.
Review and update URLs
When cloning a website for staging purposes, reviewing and updating URLs is essential to ensure content is accurately mirrored on the new site.
Best practices for updating URLs include searching for hard-coded links within the source code and checking external resources such as CSS and JavaScript files to ensure all link destinations are accurate. It’s also a good idea to test the new site afterward to check that everything works correctly.
Also, it may be necessary to adjust the URL structure to ensure users can still access their accounts or other content without running into errors.
Create regular backups
Creating regular backups of your website is a critical step for avoiding data losses or other issues. Backups should be created at least once a week and saved in secure locations, ideally off-site, for additional protection.
For best results, try to store the backup files on a different server than the one hosting the site to ensure that you have a copy available in an emergency. Additionally, consider automating the process using a plugin or script to save time and effort.
How to clone a website for staging with Website Pro
If you manage multiple WordPress sites for clients, you’ll need a solution that also creates and manages the staging versions of their sites as well. Luckily, Website Pro makes cloning any website a breeze. All you have to do is:
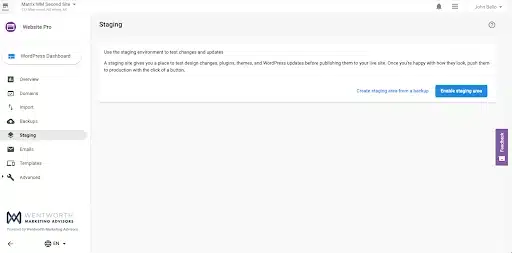
- Open the Website Pro dashboard.
- Open the sidebar menu and navigate to the staging view.
- On the staging view, you can either click:
- Create a staging area from a backup.
- Enable a staging area from scratch.
From there, all you have to do is wait a few minutes for the website to be cloned, and you’ll have access to several options to create and reset your staging environment. Here are just some of the features you can take advantage of from the staging dashboard.
Access the visual builder
Website Pro lets you easily edit and update your staging site at just the push of a button. All you have to do is click the “edit my site” button on the staging dashboard to start working on your staging environment to test, new website, features, plug-ins, or themes.
Reset the staging site
Should you encounter errors during your testing and staging, and you want to restore your staging site back to a specific version, simply click the “Reset staging area from a backup button.” You can reset the staging site to the following settings:
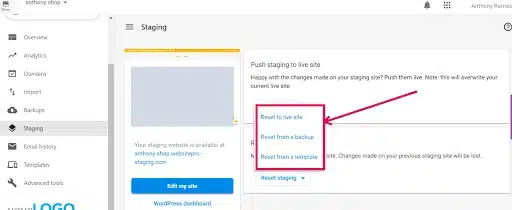
- Reset to the live site. This will restore the staging site to the latest version of the live site.
- Reset from a backup. Allows you to restore the site from any backup file you choose.
- Reset from a template. This lets you choose from a set list of templates and install a fresh new website template to your staging environment, which will change the layout and design of the site.
Push staging to live
Once you’re satisfied with the changes and updates you made to your client’s website, you can easily push these changes to the live website with the push to live site button. From there, you have the option to either replace only the file system, or the entire site along with its database and file system.
You even have the option to preserve the staging files for later edits, should you need them.
Important tips for how to clone a website for staging
Migrate the database to a new location
Whether you’re testing, new features, changing the layout or installing new plug-ins it’s important to migrate the database to a new location with an exact replica of the original site’s database, but not the original. This ensures all the content and data from the original site remain present and active in the live version without it getting affected by any changes or experimentation done on the staging site.
Update site URLs
As a precaution, make sure the URLs of the staging environment are completely different and identifiable from the live version of the website. Not only does this help mitigate any risks in users accidentally stumbling onto the staging version of the site, but it also helps you avoid any confusion with which version you’re working on just by looking at the URL itself.
Using the same URLs as the live version could also cause problems SEO-wise, as search engines may consider the clone website as duplicate content and penalize both sites in the process.
Disable search engine indexing
For extra reassurance on your live site’s SEO traffic performance, it’s best to ensure the cloned website stays de-indexed from search engines. This will prevent search engines from crawling and ranking it and cannibalizing the live site in search result pages. Make sure to edit your website’s robots.txt file so the staging site doesn’t get crawled, but if you want to save some time, consider using a plug-in to edit it hassle-free.
Secure the staging site
Just like with any other website, cybersecurity is also paramount with the staging site. When working on a staging environment, only let authorized users work on the site so no one else can steal or corrupt the data from it, as any compromises could affect the live site as well.
As an extra precaution, always keep track of every user accessing the staging site and make sure it’s only from authorized users. You should also make sure each login password is strong and implement additional security measures, such as firewalls and malware scanners.
Backup, update, and test the staging site often
It pays to build regular website maintenance habits, even for the staging version of your client’s website.
- Backing up the staging site often adds extra peace of mind to ensure you don’t lose any data if issues or errors occur while any testing takes place. This lets you easily restore it to the most recent version of the site before you made the changes.
- Updating the staging site frequently prevents any security vulnerabilities or bugs from getting through, and that your staging site stays compatible with the latest software and plugins available.
- Testing the staging site regularly helps you catch any issues or errors early enough so you can make necessary changes and updates before they go live.
Common mistakes to avoid when cloning a website
Cloning a website is a simple process. But avoiding making mistakes when cloning a site is essential, as they can lead to problems. Here are some of the most common errors:
Failing to update any active plugins or software
Before cloning, any active plugins should be updated (or deactivated and removed) to avoid potential conflicts on the staging server. Additionally, make sure to thoroughly test the cloned site afterward to check for any errors that could have been caused by not having updated plugins and software beforehand.
Whether you’re testing new themes, plug-ins, or even different versions of WordPress for your client’s website, address any compatibility issues as soon as they arise. This will ensure every feature works on the staging version of the site before getting pushed live, and mitigate any potential issues down the road.
Overwriting the production site
In any case with a staging site, never replace or delete any original files from the live website that were migrated over to the cloned website for staging. Doing so could cause some future compatibility issues with tools and software, as well as permanent data loss and disruptions to the website when any changes get pushed live.
Ignoring compatibility issues
Ignoring any compatibility issues could cause functionality issues for users and potentially damage the live site when these changes are pushed live without due diligence. Like we mentioned earlier, regularly updating the plug-ins and themes for your client’s website goes a long way to prevent any functionality issues from accumulating and causing larger problems for users in the future.
Skipping the cleanup process
Before creating a staging environment for your client’s website, you should make it a habit to optimize or remove any unnecessary data or files that you’ll no longer use. This ensures, all of your data is optimized and streamline, allowing the website to load faster and run smoother while mitigating, any issues or errors during testing. Start by removing any unused plug-ins, themes, or images, and well as deleting unnecessary information from your database.
As another tip, make sure any personal or sensitive user information such as login credentials or payment information isn’t imported into the staging site as you’re testing. This to ensure any user data isn’t overwritten or compromised, and to mitigate any potential security risks.
Cloning a Website with Website Pro FAQs
1. What is a staging environment?
A staging environment is a safe, private copy of a live website used for testing updates, plugins, themes, design changes, or full rebuilds before anything touches the production site. It lets you experiment freely without risking downtime or breaking the live version your client’s customers rely on.
2. Why clone a website instead of testing directly on the live version?
Cloning protects the production site from bugs, plugin conflicts, layout issues, security risks, and broken functionality. It also gives you a clean space to redesign pages, test performance, and get client approval before launching changes publicly.
3. Is a staging environment the same as a production environment?
No. The production environment is the real, public-facing website. The staging environment is a closed-off duplicate used for testing. Anything done in staging has no impact on live users until you intentionally push it live.
4. How does Website Pro make cloning easier?
Website Pro creates a staging copy in a few clicks. You can clone from a backup, create staging from scratch, reset staging anytime, edit in the visual builder, and push changes live when you’re ready. No plugins, no messy migrations.
5. Can I safely reset the staging site without touching the live website?
Yes. Website Pro lets you reset staging to the current live site, a backup, or a fresh template—without affecting the production environment in any way.
6. What happens when I push staging to live?
You choose whether to replace the file system only or replace both files and the database. Website Pro handles the swap automatically, minimizing risk and downtime. You can also keep the staging environment intact for future updates.
7. Should the staging site be indexed by search engines?
No. Search engines should never index staging environments. Always disable indexing, update robots.txt, or use a plugin. This prevents duplicate content issues and protects the client’s SEO performance.
8. Do URLs need to be updated when cloning a website?
Yes. The staging version must have unique URLs so users and search engines don’t confuse it with the live site. Website Pro handles this automatically, but for manual clones you must update URLs and internal links.
9. What security precautions should I take with a staging environment?
Restrict access to approved team members only. Use strong passwords, update plugins, and run malware scans just like you would on a live site. Staging sites can become attack vectors if ignored.
10. How often should a staging site be backed up or updated?
Backup frequently, update plugins and themes regularly, and test after every major change. The staging environment should reflect the live site as closely as possible so testing is accurate and reliable.
11. What are common mistakes when cloning a website?
Skipping plugin updates, overwriting live files accidentally, ignoring compatibility warnings, leaving unnecessary files in the staging environment, or forgetting to de-index the staging version. These errors can create security risks, SEO problems, or launch delays.
